Tuesday, September 20, 2016

PRIF-29: Warning: wildcard in network parameters can cause mismatch among GPnP profile, OCR, and system


[root@rac1 bin]# ./oifcfg getif
*  192.168.1.0  global  public
*  192.168.0.0  global  cluster_interconnect
eth0  192.168.1.0  global  public
eth1  192.168.0.0  global  cluster_interconnect
Only in OCR: eth0  192.168.1.0  global  cluster_interconnect,public
PRIF-51: interface [eth0] is set to both public and cluster_interconnect
PRIF-29: Warning: wildcard in network parameters can cause mismatch among GPnP profile, OCR, and system
[root@rac1 bin]#
[root@rac1 bin]#
[root@rac1 bin]#
[root@rac1 bin]# ./oifcfg setif -global eth0/192.168.1.0:public
[root@rac1 bin]#
[root@rac1 bin]#
[root@rac1 bin]# ./oifcfg setif -global eth1/192.168.0.0:cluster_interconnect
[root@rac1 bin]#
[root@rac1 bin]#
[root@rac1 bin]#
[root@rac1 bin]# ./oifcfg getif
*  192.168.1.0  global  public
*  192.168.0.0  global  cluster_interconnect
eth0  192.168.1.0  global  public
eth1  192.168.0.0  global  cluster_interconnect
PRIF-29: Warning: wildcard in network parameters can cause mismatch among GPnP profile, OCR, and system
[root@rac1 bin]#
[root@rac1 bin]#
[root@rac1 bin]# ./oifcfg delif -global */192.168.1.0
[root@rac1 bin]#
[root@rac1 bin]#
[root@rac1 bin]# ./oifcfg delif -global */192.168.0.0
[root@rac1 bin]#
[root@rac1 bin]#
[root@rac1 bin]# ./oifcfg getif
eth0  192.168.1.0  global  public
eth1  192.168.0.0  global  cluster_interconnect
[root@rac1 bin]#
[root@rac1 bin]#


after restart cluster

CHANGE VIP STATUS FROM INTERMEDIATE STATE TO BACK ONLINE IN RAC

CHANGE VIP STATUS FROM INTERMEDIATE STATE TO BACK ONLINE
==================================================================


[root@rac1 bin]# ./crsctl status res -t
--------------------------------------------------------------------------------
NAME           TARGET  STATE        SERVER                   STATE_DETAILS
--------------------------------------------------------------------------------
Local Resources
--------------------------------------------------------------------------------
ora.DATA1.dg
               ONLINE  ONLINE       rac1
               ONLINE  ONLINE       rac2
ora.DATA2.dg
               ONLINE  ONLINE       rac1
               ONLINE  ONLINE       rac2
ora.LISTENER.lsnr
               ONLINE  OFFLINE      rac1
               ONLINE  ONLINE       rac2
ora.asm
               ONLINE  ONLINE       rac1                     Started
               ONLINE  ONLINE       rac2                     Started
ora.gsd
               OFFLINE OFFLINE      rac1
               OFFLINE OFFLINE      rac2
ora.net1.network
               ONLINE  ONLINE       rac1
               ONLINE  ONLINE       rac2
ora.ons
               ONLINE  ONLINE       rac1
               ONLINE  ONLINE       rac2
--------------------------------------------------------------------------------
Cluster Resources
--------------------------------------------------------------------------------
ora.LISTENER_SCAN1.lsnr
      1        ONLINE  ONLINE       rac1
ora.LISTENER_SCAN2.lsnr
      1        ONLINE  ONLINE       rac1
ora.LISTENER_SCAN3.lsnr
      1        ONLINE  ONLINE       rac1
ora.cvu
      1        ONLINE  ONLINE       rac1
ora.oc4j
      1        ONLINE  ONLINE       rac2
ora.rac1.vip
      1        ONLINE  INTERMEDIATE rac2
ora.rac2.vip
      1        ONLINE  ONLINE       rac2
ora.scan1.vip
      1        ONLINE  ONLINE       rac1
ora.scan2.vip
      1        ONLINE  ONLINE       rac1
ora.scan3.vip
      1        ONLINE  ONLINE       rac1
[root@rac1 bin]# crsctl status resource ora.rac1.vip
-bash: crsctl: command not found
[root@rac1 bin]#
[root@rac1 bin]# ./crsctl status resource ora.rac1.vip
NAME=ora.rac1.vip
TYPE=ora.cluster_vip_net1.type
TARGET=ONLINE
STATE=INTERMEDIATE on rac2

[root@rac1 bin]# ./crsctl stop resource ora.rac1.vip
CRS-2673: Attempting to stop 'ora.rac1.vip' on 'rac2'
CRS-2677: Stop of 'ora.rac1.vip' on 'rac2' succeeded
[root@rac1 bin]#
[root@rac1 bin]# ./crsctl start resource ora.rac1.vip
CRS-2672: Attempting to start 'ora.rac1.vip' on 'rac1'
CRS-2676: Start of 'ora.rac1.vip' on 'rac1' succeeded
CRS-2672: Attempting to start 'ora.LISTENER.lsnr' on 'rac1'
CRS-2676: Start of 'ora.LISTENER.lsnr' on 'rac1' succeeded
[root@rac1 bin]#
[root@rac1 bin]#
[root@rac1 bin]# ./crsctl status resource ora.rac1.vip
NAME=ora.rac1.vip
TYPE=ora.cluster_vip_net1.type
TARGET=ONLINE
STATE=ONLINE on rac1

[root@rac1 bin]#
[root@rac1 bin]# ./crsctl status res -t
--------------------------------------------------------------------------------
NAME           TARGET  STATE        SERVER                   STATE_DETAILS
--------------------------------------------------------------------------------
Local Resources
--------------------------------------------------------------------------------
ora.DATA1.dg
               ONLINE  ONLINE       rac1
               ONLINE  ONLINE       rac2
ora.DATA2.dg
               ONLINE  ONLINE       rac1
               ONLINE  ONLINE       rac2
ora.LISTENER.lsnr
               ONLINE  ONLINE       rac1
               ONLINE  ONLINE       rac2
ora.asm
               ONLINE  ONLINE       rac1                     Started
               ONLINE  ONLINE       rac2                     Started
ora.gsd
               OFFLINE OFFLINE      rac1
               OFFLINE OFFLINE      rac2
ora.net1.network
               ONLINE  ONLINE       rac1
               ONLINE  ONLINE       rac2
ora.ons
               ONLINE  ONLINE       rac1
               ONLINE  ONLINE       rac2
--------------------------------------------------------------------------------
Cluster Resources
--------------------------------------------------------------------------------
ora.LISTENER_SCAN1.lsnr
      1        ONLINE  ONLINE       rac1
ora.LISTENER_SCAN2.lsnr
      1        ONLINE  ONLINE       rac1
ora.LISTENER_SCAN3.lsnr
      1        ONLINE  ONLINE       rac1
ora.cvu
      1        ONLINE  ONLINE       rac1
ora.oc4j
      1        ONLINE  ONLINE       rac2
ora.rac1.vip
      1        ONLINE  ONLINE       rac1
ora.rac2.vip
      1        ONLINE  ONLINE       rac2
ora.scan1.vip
      1        ONLINE  ONLINE       rac1
ora.scan2.vip
      1        ONLINE  ONLINE       rac1
ora.scan3.vip
      1        ONLINE  ONLINE       rac1
[root@rac1 bin]#
[root@rac1 bin]#


Possible resource state :-
==============================

Tuesday, August 30, 2016

How to Restore database using Cold Backup in Noarchivelog Mode Without Online Redo Logs

Restoring a Cold Backup in Noarchivelog Mode Without Online Redo Logs
====================================================================

1. Shut down the instance.
2. Copy the control files and data files back from the backup.
3. Start up the database in mount mode.
4. Open the database with the OPEN RESETLOGS clause.


Step 1. Shut Down the Instance
--------------------------------------------------------------------------------------


$ sqlplus / as sysdba
SQL> shutdown abort;


Step 2. Copy the Files Back(datafiles and controlfiles) from the Backup without redo logfiles backup
----------------------------------------------------------------------------------------------------

$ cp <backup directory>/*.* < database file directory>


Step 3. Start Up the Database in Mount Mode
----------------------------------------------------------------------------------------------------

$ sqlplus / as sysdba
SQL> startup mount


Step 4. Open the Database with the OPEN RESETLOGS Clause
--------------------------------------------------------------------------------------------------

SQL> alter database open resetlogs;

you will get error


ORA-01139: RESETLOGS option only valid after an incomplete database recovery


{SQL> alter database open resetlogs;
alter database open resetlogs
*
ERROR at line 1:
ORA-01139: RESETLOGS option only valid after an incomplete database recovery}


SQL>


SQL> recover database;
ORA-00283: recovery session canceled due to errors
ORA-00264: no recovery required


SQL> alter database open resetlogs;
alter database open resetlogs
*
ERROR at line 1:
ORA-01139: RESETLOGS option only valid after an incomplete database recovery


SQL> recover database until cancel;
Media recovery complete.
SQL>

SQL> alter database open;
alter database open
*
ERROR at line 1:
ORA-01589: must use RESETLOGS or NORESETLOGS option for database open


SQL>


Now, attempt to open your database with the OPEN RESETLOGS clause:
SQL> alter database open resetlogs;


==========================================
>>> Error you will get:-
==========================================


SQL> startup
ORACLE instance started.

Total System Global Area 1043886080 bytes
Fixed Size                  2259840 bytes
Variable Size             654312576 bytes
Database Buffers          381681664 bytes
Redo Buffers                5632000 bytes
Database mounted.
ORA-03113: end-of-file on communication channel
Process ID: 10280
Session ID: 1 Serial number: 5

***Need shut abort and go step 3

In alert log you will get below error:
---------------------------------------------
ALTER DATABASE OPEN
Errors in file /u01/app/oracle/diag/rdbms/bsnl/bsnl/trace/bsnl_lgwr_10259.trc:
ORA-00313: open failed for members of log group 1 of thread 1
ORA-00312: online log 1 thread 1: '/u01/app/oracle/oradata/bsnl/redo01.log'
ORA-27037: unable to obtain file status
Linux-x86_64 Error: 2: No such file or directory
Additional information: 3
Errors in file /u01/app/oracle/diag/rdbms/bsnl/bsnl/trace/bsnl_ora_10280.trc:
ORA-00313: open failed for members of log group 1 of thread
ORA-00312: online log 1 thread 1: '/u01/app/oracle/oradata/bsnl/redo01.log'
System state dump requested by (instance=1, osid=10280), summary=[abnormal instance termination].
System State dumped to trace file /u01/app/oracle/diag/rdbms/bsnl/bsnl/trace/bsnl_diag_10249_20160829041454.trc
USER (ospid: 10280): terminating the instance due to error 313
Dumping diagnostic data in directory=[cdmp_20160829041454], requested by (instance=1, osid=10280), summary=[abnormal instance termination].
Instance terminated by USER, pid = 10280

How to Restore database using Cold Backup in Noarchivelog Mode with Online Redo Logs

Restoring a Cold Backup in Noarchivelog Mode with Online Redo Logs

=======================================================================


1. Shut down the instance.
2. Copy the data files, online redo logs, temporary files, and control files back from the
   backup to the live database data file locations.
3. Start up your database


Step 1. Shut Down the Instance
-------------------------------------------------------------------------------------------

[oracle@mylab bsnl]$ sqlplus "/as sysdba"
SQL> shutdown abort;


Step 2. Copy the Files Back from the Backup
---------------------------------------------------------------------------------------------

[oracle@mylab bsnl]$  cp /u02/backup/bsnl_30082016/*  /u01/app/oracle/oradata/bsnl/

** must be copy files as previous location when take backup so keep location information

Step 3. Start Up the Database
----------------------------------------------------------------------------------

Connect to your database as SYS (or a user that has SYSDBA privileges), and start up your database:
[oracle@mylab bsnl]$ sqlplus "/as sysdba"

SQL> startup;


**It’s as if you set your database back to the point in time when you made the backup.

How to take cold backup of database in noarchivelog mode


Cold Backup of a database in noarchivelog mode
=======================================================

1. Determine where to copy the backup files and how much space is required.
2. Identify the locations and names of the database files to copy.
3. Shut down the database with the IMMEDIATE, TRANSACTIONAL, or NORMAL clause.
4. Copy the files (identified in step 2) to the backup location (determined in step 1).
5. Restart your database

Login as sys user
-----------------------------

SQL> select name,open_mode,log_mode from v$database;

NAME      OPEN_MODE            LOG_MODE
--------- -------------------- ------------
BSNL      READ WRITE           NOARCHIVELOG

SQL>


Step 1. Determine Where to Copy the Backup Files and How Much Space is Required
---------------------------------------------------------------------------------------------------------------


select sum(sum_bytes)/1024/1024 m_bytes
from(
select sum(bytes) sum_bytes from v$datafile
union
select sum(bytes) sum_bytes from v$tempfile
union
select (sum(bytes) * members) sum_bytes from v$log
group by members);


Step 2. Identify the Locations and Names of the Database Files to Copy
--------------------------------------------------------------------------------------------------------

select name from v$datafile
union
select name from v$controlfile
union
select name from v$tempfile
union
select member from v$logfile;

Step 3.Take backup of controlfile and pfile from spfile if database run using spfile or copy pfile  to backup location
-----------------------------------------------------------------------------------------------------------------

SQL> create pfile='/u01/app/oracle/u02/backup/init_bkp_30082016.ora' from spfile;

File created.

SQL> alter database backup controlfile to trace as '/u01/app/oracle/u02/backup/control_bkp_30082016';

Database altered.


** The online redo logs are required to open the database in a normal manner.
If you back up all files (including the online redo logs), then to get your database back to the state it was in at the
time of the backup, you restore all files (including the online redo logs) and start up your database

Step 4. Shut Down the Database
-----------------------------------------------------------------------------------------


[oracle@mylab bsnl]$ sqlplus "/as sysdba"

SQL> shutdown immediate


Step 5. Create Backup Copies of the Files
----------------------------------------------------------------------------------

using OS copy command (cp) to copy database files

cp /u01/app/oracle/oradata/bsnl/* /u02/backup/bsnl_30082016/


Step 6. Start Your Database
----------------------------------------------------------------------------------------
[oracle@mylab bsnl]$ sqlplus "/as sysdba"

SQL> startup
SQL>


backup sql script:
---------------------------

create pfile='/u01/app/oracle/u02/backup/init_bkp_30082016.ora' from spfile;

alter database backup controlfile to trace as '/u01/app/oracle/u02/backup/control_bkp_30082016';

select 'cp ' || name || ' ' || '/u01/app/oracle/u02/backup/' from v$datafile;

select 'cp ' || name || ' ' || '/u01/app/oracle/u02/backup/' from v$tempfile;

select 'cp ' || member || ' ' || '/u01/app/oracle/u02/backup/' from v$logfile;

select 'cp ' || name || ' ' || '/u01/app/oracle/u02/backup/' from v$controlfile;

Sunday, August 28, 2016

ORA-00205: error in identifying control file, check alert log for more info / Removing a Control File


ORA-00205: error in identifying control file, check alert log for more info

If you recieve error then check controlfile physcial location  then remove bad controlfile location from database(control_files parameter ):


1. Identify which control file has experienced media failure by inspecting the alert.log for
information

ORA-00210: cannot open the specified control file
ORA-00202: control file: '/u01/app/oracle/oradata/bsnl/control_files/control03.ctl'
ORA-27037: unable to obtain file status


2. Remove the unavailable control file name from the CONTROL_FILES parameter. If you’re
using an init.ora file, modify the file directly with an OS editor (such as vi). If you’re
using an spfile, modify the CONTROL_FILES parameter with the ALTER SYSTEM statement.
In this spfile example the control02.ctl control file is removed from the CONTROL_FILES
parameter:


alter system set control_files= '/u01/app/oracle/oradata/bsnl/control01.ctl','/u01/app/oracle/fast_recovery_area/bsnl/control02.ctl' scope=spfile;

3. Stop and start your database:
SQL> shutdown immediate;
SQL> startup;

How to Move/Add/Multiplex Control file


Adding controlfile in database means copy an existing controlfile and making database aware of copy by modifying control_files parameter .

Steps to Add controlfile :
==================================

Step 1:-

Alter the initialization CONTROL_FILES parameter to include new location and name of controlfile.

Step 2:-

Shutdown database

Step 3:-

Use OS command to copy  existing good control file  to new location and rename .

Step 4:-

start database


If database use pfile
============================
shutdown database,
copy one of controlfile to new locations,
manually edit pfile
startup database.


Example:
[oracle@mylab ~]$ sqlplus "/as sysdba"


**************************************************************
check current controlfiles  location information
***************************************************************

SQL> show parameter control_files

NAME                                 TYPE        VALUE
------------------------------------ ----------- ------------------------------
control_files                        string      /u01/app/oracle/oradata/bsnl/control01.ctl, /u01/app/oracle/fast_recovery_area/bsnl/control02.ctl
SQL>


*****************************************************************************
 Make change CONTROL_FILES parameter  with new location using below command
*****************************************************************************

SQL > alter system set control_files= '/u01/app/oracle/oradata/bsnl/control01.ctl', '/u01/app/oracle/fast_recovery_area/bsnl/control02.ctl', '/u01/app/oracle/oradata/bsnl/control_files/control03.ctl' scope=spfile;


*******************************************
 Shut down database
*****************************************
SQL> shut immediate


**********************************************
Use OS command copy controlfile to new location
**********************************************

[oracle@mylab bsnl]$
[oracle@mylab bsnl]$ cp control01.ctl control_files/control03.ctl
[oracle@mylab bsnl]$


********************************************
Start database
********************************************
[oracle@mylab ~]$ sqlplus "/as sysdba"

SQL> startup

SQL> show parameter control_files

NAME                                 TYPE        VALUE
------------------------------------ ----------- ------------------------------
control_files                        string      /u01/app/oracle/oradata/bsnl/control01.ctl, /u01/app/oracle/fast_recovery_area/bsnl/control02.ctl, /u01/app/oracle/oradata/bsnl/control_files/control03.ctl


How to Migrate SQL Profiles from One database to Another database

===============================How to Migrate SQL Profiles from One database to Another database=========================================


You can migrate SQL profile using export and import from one database to another database just like stored outline. Prior to oracle 10g you can migrate SQL profiles with the dbms_sqltune.import_sql_profile procedure where as in oracle 10g release 2 and beyond using dbms_sqltune package. In both case you have to create a staging table on the source database and populate that staging table with the relevant data. Below is the step to migrate SQL profile in 10g release 2.

Step1. Create the staging table to store SQL Profiles in source database
SQL> sys/oracle@orcl as sysdba
SQL> BEGIN
DBMS_SQLTUNE.CREATE_STGTAB_SQLPROF
(table_name => ‘SQL_PROFILES’,schema_name=>TEST');
     END;
/
PL/SQL procedure successfully completed.


Step2. Now Copy SQL profiles from SYS to the Staging table
SQL> BEGIN
DBMS_SQLTUNE.PACK_STGTAB_SQLPROF
(profile_name => 'PROF_4m0c9guyqybbd_2738228381',
staging_table_name => 'SQL_PROFILES',
staging_schema_owner=>'TEST');
END;
/
PL/SQL procedure successfully completed.
Note: As you need to copy all SQL profiles on my database ‘%’ value for profile_category was the best option.


Step3. Export the staging table at source
SQL> select count(*) from TEST.sql_profiles;
COUNT(*)
-------------
3
expdp system/***** dumpfile=expdp_sql_profiles.dmp TABLES=TEST.SQL_PROFILES DIRECTORY=DPUMP


Step4. Restore the database with the backup taken before all SQL profiles were generated and import the staging table at target database.
impdp system/***** dumpfile=expdp_sql_profiles.dmp TABLES=TEST.SQL_PROFILES DIRECTORY=DPUMP TABLE_EXISTS_ACTION=REPLACE
Note: Do not forget to create staging table on destination database. Use replace = TRUE if you need to have same SQL_Profiles on both the database.


Step5. Finally Unpack the SQL profiles from the staging table on destination database.
SQL> BEGIN
DBMS_SQLTUNE.UNPACK_STGTAB_SQLPROF
(staging_table_name => ‘SQL_PROFILES’,
staging_schema_owner=>’TEST2’, replace=>FALSE);
END;
/
PL/SQL procedure successfully completed.

Saturday, July 2, 2016

Add partition in LVM linux

root@localhost dev]#
[root@localhost dev]# fdisk /dev/sdc
Device contains neither a valid DOS partition table, nor Sun, SGI or OSF disklabel
Building a new DOS disklabel with disk identifier 0x50f6f010.
Changes will remain in memory only, until you decide to write them.
After that, of course, the previous content won't be recoverable.

Warning: invalid flag 0x0000 of partition table 4 will be corrected by w(rite)

WARNING: DOS-compatible mode is deprecated. It's strongly recommended to
         switch off the mode (command 'c') and change display units to
         sectors (command 'u').

Command (m for help): p

Disk /dev/sdc: 4294 MB, 4294967296 bytes
255 heads, 63 sectors/track, 522 cylinders
Units = cylinders of 16065 * 512 = 8225280 bytes
Sector size (logical/physical): 512 bytes / 512 bytes
I/O size (minimum/optimal): 512 bytes / 512 bytes
Disk identifier: 0x50f6f010

   Device Boot      Start         End      Blocks   Id  System

Command (m for help): n
Command action
   e   extended
   p   primary partition (1-4)
p
Partition number (1-4): 1
First cylinder (1-522, default 1):
Using default value 1
Last cylinder, +cylinders or +size{K,M,G} (1-522, default 522):
Using default value 522

Command (m for help): p

Disk /dev/sdc: 4294 MB, 4294967296 bytes
255 heads, 63 sectors/track, 522 cylinders
Units = cylinders of 16065 * 512 = 8225280 bytes
Sector size (logical/physical): 512 bytes / 512 bytes
I/O size (minimum/optimal): 512 bytes / 512 bytes
Disk identifier: 0x50f6f010

   Device Boot      Start         End      Blocks   Id  System
/dev/sdc1               1         522     4192933+  83  Linux

Command (m for help): t
Selected partition 1
Hex code (type L to list codes): 8e
Changed system type of partition 1 to 8e (Linux LVM)

Command (m for help): p

Disk /dev/sdc: 4294 MB, 4294967296 bytes
255 heads, 63 sectors/track, 522 cylinders
Units = cylinders of 16065 * 512 = 8225280 bytes
Sector size (logical/physical): 512 bytes / 512 bytes
I/O size (minimum/optimal): 512 bytes / 512 bytes
Disk identifier: 0x50f6f010

   Device Boot      Start         End      Blocks   Id  System
/dev/sdc1               1         522     4192933+  8e  Linux LVM

Command (m for help): w
The partition table has been altered!

Calling ioctl() to re-read partition table.
Syncing disks.
[root@localhost dev]#
[root@localhost dev]#
[root@localhost dev]#
[root@localhost dev]# pvscan
  PV /dev/sdb1   VG oracle_lab   lvm2 [2.00 GiB / 1.61 GiB free]
  PV /dev/sda2   VG VolGroup     lvm2 [19.51 GiB / 0    free]
  Total: 2 [21.50 GiB] / in use: 2 [21.50 GiB] / in no VG: 0 [0   ]
[root@localhost dev]#
[root@localhost dev]#
[root@localhost dev]# pvcreate /dev/sdc1
  Physical volume "/dev/sdc1" successfully created
[root@localhost dev]#
[root@localhost dev]# pvscan
  PV /dev/sdb1   VG oracle_lab      lvm2 [2.00 GiB / 1.61 GiB free]
  PV /dev/sda2   VG VolGroup        lvm2 [19.51 GiB / 0    free]
  PV /dev/sdc1                      lvm2 [4.00 GiB]
  Total: 3 [25.50 GiB] / in use: 2 [21.50 GiB] / in no VG: 1 [4.00 GiB]
[root@localhost dev]#
[root@localhost dev]# vgextend oracle_lab /dev/sdc1
  Volume group "oracle_lab" successfully extended
[root@localhost dev]#
[root@localhost dev]# pvs
  PV         VG         Fmt  Attr PSize  PFree
  /dev/sda2  VolGroup   lvm2 a--  19.51g    0
  /dev/sdb1  oracle_lab lvm2 a--   2.00g 1.61g
  /dev/sdc1  oracle_lab lvm2 a--   4.00g 4.00g
[root@localhost dev]#

[root@localhost oracle_lab]#
[root@localhost oracle_lab]# lvextend /dev/oracle_lab/u01 /dev/sdc1
  Extending logical volume u01 to 4.39 GiB
  Logical volume u01 successfully resized
[root@localhost oracle_lab]#

[root@localhost oracle_lab]# resize2fs /dev/oracle_lab/u01
resize2fs 1.43-WIP (20-Jun-2013)
Filesystem at /dev/oracle_lab/u01 is mounted on /u01; on-line resizing required
old_desc_blocks = 2, new_desc_blocks = 18
The filesystem on /dev/oracle_lab/u01 is now 4599808 blocks long.

[root@localhost oracle_lab]#
[root@localhost oracle_lab]# df -h
Filesystem                    Size  Used Avail Use% Mounted on
/dev/mapper/VolGroup-lv_root   18G  3.9G   13G  24% /
tmpfs                         2.0G  112K  2.0G   1% /dev/shm
/dev/sda1                     477M   55M  397M  13% /boot
/dev/mapper/oracle_lab-u01    4.3G  3.1M  4.1G   1% /u01
[root@localhost oracle_lab]#

How To Setup Logical Volume Manager (LVM) Step By Step in Linux


LVM allows users to dynamically extend or shrink Linux “partition” or file system in online mode.

We create lvm using /dev/sdb disk

[root@localhost ~]#
[root@localhost ~]# df -h
Filesystem                    Size  Used Avail Use% Mounted on
/dev/mapper/VolGroup-lv_root   18G  3.9G   13G  24% /
tmpfs                         2.0G  4.0K  2.0G   1% /dev/shm
/dev/sda1                     477M   55M  397M  13% /boot
[root@localhost ~]#
[root@localhost ~]#
[root@localhost ~]# fdisk -l

Disk /dev/sda: 21.5 GB, 21474836480 bytes
255 heads, 63 sectors/track, 2610 cylinders
Units = cylinders of 16065 * 512 = 8225280 bytes
Sector size (logical/physical): 512 bytes / 512 bytes
I/O size (minimum/optimal): 512 bytes / 512 bytes
Disk identifier: 0x000b52b7

   Device Boot      Start         End      Blocks   Id  System
/dev/sda1   *           1          64      512000   83  Linux
Partition 1 does not end on cylinder boundary.
/dev/sda2              64        2611    20458496   8e  Linux LVM

Disk /dev/sdb: 2147 MB, 2147483648 bytes
255 heads, 63 sectors/track, 261 cylinders
Units = cylinders of 16065 * 512 = 8225280 bytes
Sector size (logical/physical): 512 bytes / 512 bytes
I/O size (minimum/optimal): 512 bytes / 512 bytes
Disk identifier: 0x00000000


Disk /dev/mapper/VolGroup-lv_root: 18.8 GB, 18798870528 bytes
255 heads, 63 sectors/track, 2285 cylinders
Units = cylinders of 16065 * 512 = 8225280 bytes
Sector size (logical/physical): 512 bytes / 512 bytes
I/O size (minimum/optimal): 512 bytes / 512 bytes
Disk identifier: 0x00000000


Disk /dev/mapper/VolGroup-lv_swap: 2147 MB, 2147483648 bytes
255 heads, 63 sectors/track, 261 cylinders
Units = cylinders of 16065 * 512 = 8225280 bytes
Sector size (logical/physical): 512 bytes / 512 bytes
I/O size (minimum/optimal): 512 bytes / 512 bytes
Disk identifier: 0x00000000


root@localhost ~]# fdisk /dev/sdb
Device contains neither a valid DOS partition table, nor Sun, SGI or OSF disklabel
Building a new DOS disklabel with disk identifier 0x96749b02.
Changes will remain in memory only, until you decide to write them.
After that, of course, the previous content won't be recoverable.

Warning: invalid flag 0x0000 of partition table 4 will be corrected by w(rite)

WARNING: DOS-compatible mode is deprecated. It's strongly recommended to
         switch off the mode (command 'c') and change display units to
         sectors (command 'u').

Command (m for help): p

Disk /dev/sdb: 2147 MB, 2147483648 bytes
255 heads, 63 sectors/track, 261 cylinders
Units = cylinders of 16065 * 512 = 8225280 bytes
Sector size (logical/physical): 512 bytes / 512 bytes
I/O size (minimum/optimal): 512 bytes / 512 bytes
Disk identifier: 0x96749b02

   Device Boot      Start         End      Blocks   Id  System

Command (m for help): n
Command action
   e   extended
   p   primary partition (1-4)
p
Partition number (1-4): 1
First cylinder (1-261, default 1):
Using default value 1
Last cylinder, +cylinders or +size{K,M,G} (1-261, default 261):enter
Using default value 261

Command (m for help): p

Disk /dev/sdb: 2147 MB, 2147483648 bytes
255 heads, 63 sectors/track, 261 cylinders
Units = cylinders of 16065 * 512 = 8225280 bytes
Sector size (logical/physical): 512 bytes / 512 bytes
I/O size (minimum/optimal): 512 bytes / 512 bytes
Disk identifier: 0x96749b02

   Device Boot      Start         End      Blocks   Id  System
/dev/sdb1               1         261     2096451   83  Linux

Command (m for help): t
Selected partition 1
Hex code (type L to list codes): l

 0  Empty           24  NEC DOS         81  Minix / old Lin bf  Solaris
 1  FAT12           39  Plan 9          82  Linux swap / So c1  DRDOS/sec (FAT-
 2  XENIX root      3c  PartitionMagic  83  Linux           c4  DRDOS/sec (FAT-
 3  XENIX usr       40  Venix 80286     84  OS/2 hidden C:  c6  DRDOS/sec (FAT-
 4  FAT16 <32M      41  PPC PReP Boot   85  Linux extended  c7  Syrinx
 5  Extended        42  SFS             86  NTFS volume set da  Non-FS data
 6  FAT16           4d  QNX4.x          87  NTFS volume set db  CP/M / CTOS / .
 7  HPFS/NTFS       4e  QNX4.x 2nd part 88  Linux plaintext de  Dell Utility
 8  AIX             4f  QNX4.x 3rd part 8e  Linux LVM       df  BootIt
 9  AIX bootable    50  OnTrack DM      93  Amoeba          e1  DOS access
 a  OS/2 Boot Manag 51  OnTrack DM6 Aux 94  Amoeba BBT      e3  DOS R/O
 b  W95 FAT32       52  CP/M            9f  BSD/OS          e4  SpeedStor
 c  W95 FAT32 (LBA) 53  OnTrack DM6 Aux a0  IBM Thinkpad hi eb  BeOS fs
 e  W95 FAT16 (LBA) 54  OnTrackDM6      a5  FreeBSD         ee  GPT
 f  W95 Ext'd (LBA) 55  EZ-Drive        a6  OpenBSD         ef  EFI (FAT-12/16/
10  OPUS            56  Golden Bow      a7  NeXTSTEP        f0  Linux/PA-RISC b
11  Hidden FAT12    5c  Priam Edisk     a8  Darwin UFS      f1  SpeedStor
12  Compaq diagnost 61  SpeedStor       a9  NetBSD          f4  SpeedStor
14  Hidden FAT16 <3 63  GNU HURD or Sys ab  Darwin boot     f2  DOS secondary
16  Hidden FAT16    64  Novell Netware  af  HFS / HFS+      fb  VMware VMFS
17  Hidden HPFS/NTF 65  Novell Netware  b7  BSDI fs         fc  VMware VMKCORE
18  AST SmartSleep  70  DiskSecure Mult b8  BSDI swap       fd  Linux raid auto
1b  Hidden W95 FAT3 75  PC/IX           bb  Boot Wizard hid fe  LANstep
1c  Hidden W95 FAT3 80  Old Minix       be  Solaris boot    ff  BBT
1e  Hidden W95 FAT1
Hex code (type L to list codes): 8e
Changed system type of partition 1 to 8e (Linux LVM)

Command (m for help): p

Disk /dev/sdb: 2147 MB, 2147483648 bytes
255 heads, 63 sectors/track, 261 cylinders
Units = cylinders of 16065 * 512 = 8225280 bytes
Sector size (logical/physical): 512 bytes / 512 bytes
I/O size (minimum/optimal): 512 bytes / 512 bytes
Disk identifier: 0x96749b02

   Device Boot      Start         End      Blocks   Id  System
/dev/sdb1               1         261     2096451   8e  Linux LVM

Command (m for help): w
The partition table has been altered!

Calling ioctl() to re-read partition table.
Syncing disks.
[root@localhost ~]#
[root@localhost ~]# partprobe /dev/sdb
[root@localhost ~]#
[root@localhost ~]# parted /dev/sdb print free
Model: ATA VBOX HARDDISK (scsi)
Disk /dev/sdb: 2147MB
Sector size (logical/physical): 512B/512B
Partition Table: msdos

Number  Start   End     Size    Type     File system  Flags
 1      32.3kB  2147MB  2147MB  primary               lvm
        2147MB  2147MB  686kB            Free Space

[root@localhost ~]#
[root@localhost ~]# pvcreate /dev/sdb1
  Physical volume "/dev/sdb1" successfully created
[root@localhost ~]#
[root@localhost ~]# vgcreate oracle_lab /dev/sdb1
  Volume group "oracle_lab" successfully created
[root@localhost ~]#
[root@localhost ~]# lvcreate oracle_lab -L +1G -n u01
  Logical volume "u01" created

-L -> To specify the size of the partition in our case 1GB
-n -> To specify the name of the Logical volume in our case /u01
[root@localhost ~]#
[root@localhost ~]# lvdisplay
  --- Logical volume ---
  LV Path                /dev/oracle_lab/u01
  LV Name                u01
  VG Name                oracle_lab
  LV UUID                ht0xTA-fhfn-FeNb-ymwB-Mylx-WoQR-53wiky
  LV Write Access        read/write
  LV Creation host, time localhost.localdomain, 2016-07-02 15:26:08 +0530
  LV Status              available
  # open                 0
  LV Size                1.00 GiB
  Current LE             256
  Segments               1
  Allocation             inherit
  Read ahead sectors     auto
  - currently set to     256
  Block device           252:2

  --- Logical volume ---
  LV Path                /dev/VolGroup/lv_root
  LV Name                lv_root
  VG Name                VolGroup
  LV UUID                sej0ko-wSqc-jpOP-9CL3-5v72-McmM-hU5pvY
  LV Write Access        read/write
  LV Creation host, time localhost.localdomain, 2016-07-02 12:02:04 +0530
  LV Status              available
  # open                 1
  LV Size                17.51 GiB
  Current LE             4482
  Segments               1
  Allocation             inherit
  Read ahead sectors     auto
  - currently set to     256
  Block device           252:0

  --- Logical volume ---
  LV Path                /dev/VolGroup/lv_swap
  LV Name                lv_swap
  VG Name                VolGroup
  LV UUID                VYtpkL-CmWl-SL4a-lZ2v-pEzr-9cyj-j5Mrci
  LV Write Access        read/write
  LV Creation host, time localhost.localdomain, 2016-07-02 12:02:09 +0530
  LV Status              available
  # open                 2
  LV Size                2.00 GiB
  Current LE             512
  Segments               1
  Allocation             inherit
  Read ahead sectors     auto
  - currently set to     256
  Block device           252:1

[root@localhost ~]#
[root@localhost ~]#
root@localhost ~]#
[root@localhost ~]# mkdir /u01
[root@localhost ~]#
[root@localhost ~]#
[root@localhost oracle_lab]#
[root@localhost oracle_lab]# mkfs.ext4 /dev/oracle_lab/u01
mke2fs 1.43-WIP (20-Jun-2013)
Filesystem label=
OS type: Linux
Block size=4096 (log=2)
Fragment size=4096 (log=2)
Stride=0 blocks, Stripe width=0 blocks
65536 inodes, 262144 blocks
13107 blocks (5.00%) reserved for the super user
First data block=0
Maximum filesystem blocks=268435456


8 block groups
32768 blocks per group, 32768 fragments per group
8192 inodes per group
Superblock backups stored on blocks:
        32768, 98304, 163840, 229376

Allocating group tables: done
Writing inode tables: done
Creating journal (8192 blocks): done
Writing superblocks and filesystem accounting information: done

[root@localhost oracle_lab]#
[root@localhost oracle_lab]#
[root@localhost oracle_lab]# mount /dev/oracle_lab/u01 /u01
[root@localhost oracle_lab]#
[root@localhost oracle_lab]# df -h
Filesystem                    Size  Used Avail Use% Mounted on
/dev/mapper/VolGroup-lv_root   18G  3.9G   13G  24% /
tmpfs                         2.0G  4.0K  2.0G   1% /dev/shm
/dev/sda1                     477M   55M  397M  13% /boot
/dev/mapper/oracle_lab-u01    976M  1.3M  924M   1% /u01
[root@localhost oracle_lab]#
[root@localhost oracle_lab]#

Thursday, May 19, 2016

The added candidate disk device is not visible from all the nodes:ORA-15014: path '/dev/rASM' is not in the discovery set


when you add disk in asm diskgroup got error

Check in ASM alert log

SQL> Alter diskgroup DATA_HR add disk '/dev/rASM_PTT_001' ;
NOTE: GroupBlock outside rolling migration privileged region
ORA-15032: not all alterations performed
ORA-15031: disk specification '/dev/rASM_HR_001' matches no disks
ORA-15014: path '/dev/rASM_HR_001' is not in the discovery set
ERROR: Alter diskgroup DATA_HR add disk '/dev/rASM_HR_001'


If get error
Login as grid user

$sqlplus sys as sysasm

show parameter asm_diskstring

Alter system set asm_diskstring='/dev/rhdisk*', '/dev/rASM*'  scope=Both;


Here we have two type asm disk you can add more:-
/dev/rhdisk*', '/dev/rASM*'

Alter diskgroup DATA_HR add disk '/dev/rASM_PTT_001' ;

ref:
OERR: ORA-15014 "path '%s' is not in the discovery set" (varies by version) Reference Note ( Doc ID 194391.1 )
1389618.1 - Default Disk Discovery Path by Platform

----------------
The ASM_DISKSTRING initialization parameter specifies a comma-delimited list of strings that limits the set of disks that an Oracle ASM instance discovers.
The discovery strings can include wildcard characters. Only disks that match one of the strings are    discovered.
The same disk cannot be discovered twice.


Sunday, February 28, 2016

e2fsck: Cannot continue, aborting in linux


Step 1: mount the root file system read,write mode using below command

mount  / -o remount,rw

Step 2:

Try fsck command to recover 

Remove the file system from /etc/fstab file and restart system

Example:

/dev/sdd1 => 

init 6

Saturday, February 27, 2016

How to Upgrade Oracle Database 11.2.0.1 to 11.2.0.4 ?

Upgrade Oracle Database 11g
=================================================
===============


Database upgrade important part of DBA life . So when doing upgrade database we make note some important point :-

1. Verify all the prerequisite h/w  and s/w  for target version .
2. Use out of place upgrade method (recommended by oracle  ) 
3. Take backup of existing database which going to upgrade and  keep backup  if possible on another     server (mount point  like /bkp)
   use RMAN (Recovery manager) to take full  backup of database 


 Step 1:
============

Download Software from Oracle site.

Oracle Database (includes Oracle Database and Oracle RAC)
Note: you must download both zip files to install Oracle Database.
p13390677_112040_platform_1of7.zip
p13390677_112040_platform_2of7.zip
Oracle Grid Infrastructure (includes Oracle ASM, Oracle Clusterware, and Oracle Restart)p13390677_112040_platform_3of7.zip
Oracle Database Clientp13390677_112040_platform_4of7.zip
Oracle Gatewaysp13390677_112040_platform_5of7.zip
Oracle Examplesp13390677_112040_platform_6of7.zip
Deinstallp13390677_112040_platform_7of7.zip


We need for Database:


p13390677_112040_platform_1of7.zipp13390677_112040_platform_2of7.zip


After unzip  the downloaded software :-

unzip  p13390677_112040_platform_1of7.zip
unzip p13390677_112040_platform_2of7.zip


Step 2:
==================

Click on runInstaller and install software  with new oracle home 


Step 3:
=================
After  software install  run pre-check before upgrade on running database using new oracle home  run the prerequisite script


SQL> @/u01/app/oracle/product/11.2.0.4/db_1/rdbms/admin/utlu112i.sql


SQL> !pwd
/u01/app/oracle/product/11.2.0.4/db_1/rdbms/admin

SQL> @/u01/app/oracle/product/11.2.0.4/db_1/rdbms/admin/utlu112i.sql
Oracle Database 11.2 Pre-Upgrade Information Tool 02-27-2016 19:03:18
Script Version: 11.2.0.4.0 Build: 001
.
**********************************************************************
Database:
**********************************************************************
--> name:          FINAL
--> version:       11.2.0.1.0
--> compatible:    11.2.0.0.0
--> blocksize:     8192
--> platform:      Linux x86 64-bit
--> timezone file: V11
.
**********************************************************************
Tablespaces: [make adjustments in the current environment]
**********************************************************************
--> SYSTEM tablespace is adequate for the upgrade.
.... minimum required size: 878 MB
--> SYSAUX tablespace is adequate for the upgrade.
.... minimum required size: 497 MB
--> UNDOTBS1 tablespace is adequate for the upgrade.
.... minimum required size: 400 MB
--> TEMP tablespace is adequate for the upgrade.
.... minimum required size: 60 MB
.
**********************************************************************
Flashback: OFF
**********************************************************************
**********************************************************************
Update Parameters: [Update Oracle Database 11.2 init.ora or spfile]
Note: Pre-upgrade tool was run on a lower version 64-bit database.
**********************************************************************
--> If Target Oracle is 32-Bit, refer here for Update Parameters:
-- No update parameter changes are required.
.

--> If Target Oracle is 64-Bit, refer here for Update Parameters:
-- No update parameter changes are required.
.
**********************************************************************
Renamed Parameters: [Update Oracle Database 11.2 init.ora or spfile]
**********************************************************************
-- No renamed parameters found. No changes are required.
.
**********************************************************************
Obsolete/Deprecated Parameters: [Update Oracle Database 11.2 init.ora or spfile]
**********************************************************************
-- No obsolete parameters found. No changes are required
.

**********************************************************************
Components: [The following database components will be upgraded or installed]
**********************************************************************
--> Oracle Catalog Views         [upgrade]  VALID
--> Oracle Packages and Types    [upgrade]  VALID
--> JServer JAVA Virtual Machine [upgrade]  VALID
--> Oracle XDK for Java          [upgrade]  VALID
--> Oracle Workspace Manager     [upgrade]  VALID
--> OLAP Analytic Workspace      [upgrade]  VALID
--> OLAP Catalog                 [upgrade]  VALID
--> Oracle Text                  [upgrade]  VALID
--> Oracle XML Database          [upgrade]  VALID
--> Oracle Java Packages         [upgrade]  VALID
--> Oracle interMedia            [upgrade]  VALID
--> Spatial                      [upgrade]  VALID
--> Expression Filter            [upgrade]  VALID
--> Rule Manager                 [upgrade]  VALID
--> Oracle Application Express   [upgrade]  VALID
... APEX will only be upgraded if the version of APEX in
... the target Oracle home is higher than the current one.
--> Oracle OLAP API              [upgrade]  VALID
.
**********************************************************************
Miscellaneous Warnings
**********************************************************************
WARNING: --> Database is using a timezone file older than version 14.
.... After the release migration, it is recommended that DBMS_DST package
.... be used to upgrade the 11.2.0.1.0 database timezone version
.... to the latest version which comes with the new release.
WARNING: --> Your recycle bin is turned on and currently contains no objects.
.... Because it is REQUIRED that the recycle bin be empty prior to upgrading
.... and your recycle bin is turned on, you may need to execute the command:
        PURGE DBA_RECYCLEBIN
.... prior to executing your upgrade to confirm the recycle bin is empty.
WARNING: --> Database contains schemas with objects dependent on DBMS_LDAP package.
.... Refer to the 11g Upgrade Guide for instructions to configure Network ACLs.
.... USER APEX_030200 has dependent objects.
.
**********************************************************************
Recommendations
**********************************************************************
Oracle recommends gathering dictionary statistics prior to
upgrading the database.
To gather dictionary statistics execute the following command
while connected as SYSDBA:

    EXECUTE dbms_stats.gather_dictionary_stats;

**********************************************************************
Oracle recommends reviewing any defined events prior to upgrading.

To view existing non-default events execute the following commands
while connected AS SYSDBA:
  Events:
    SELECT (translate(value,chr(13)||chr(10),' ')) FROM sys.v$parameter2
      WHERE  UPPER(name) ='EVENT' AND  isdefault='FALSE'

  Trace Events:
    SELECT (translate(value,chr(13)||chr(10),' ')) from sys.v$parameter2
      WHERE UPPER(name) = '_TRACE_EVENTS' AND isdefault='FALSE'

Changes will need to be made in the init.ora or spfile.

**********************************************************************
SQL>

In  above output all component all valid state and check all recommendation by this script

Check db must be running using spfile


-------------------------
Set the display 

export DISPLAY=yourip :0.0
then run xclock its show popup 

Run the ./runinstaller  from command prompt


We skip this step click on netxt


We not provide support email id then show the error ignore this error click on yes


select Skip software and click on next


For upgrade select install database software only then click on next


As per  environment we select type of database 
In my case stand alone single instance database so we select single instance database installation then click on next 


select the language as  per requirement in my case is English then click on next


Choose  which database edition need to install in my case choose Enterprise Edition
then click on next


Define the Oracle Base and Software directory here we careful  when give directory locations
then click on next

we use new home here
/u01/app/oracle/product/11.2.0/db_1/


Select group then click on next


check prerequisite must be check all package are install and meet software requirement
then click on next


In my case swap alert i am ignore all here but  must be validate in environment
Then click on next


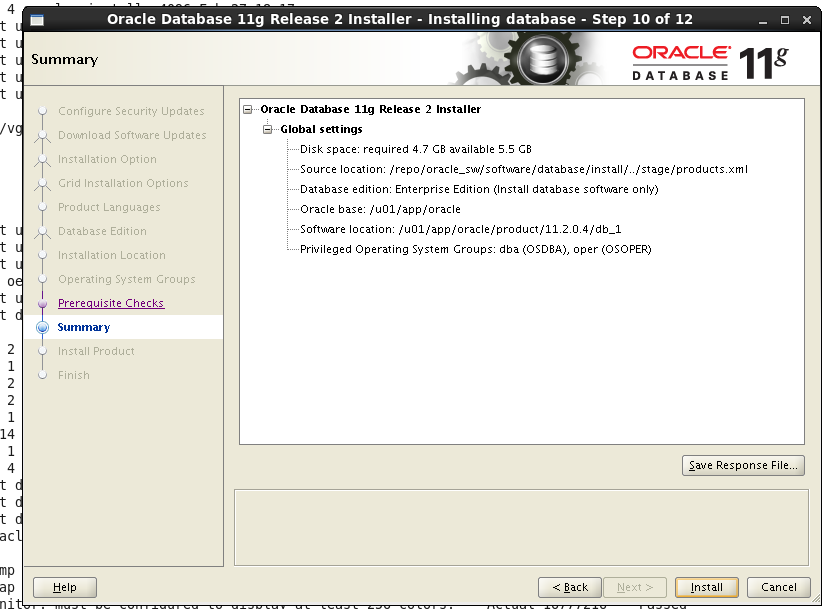
Check all parameter which you give before  parameter you define validate then click next


Here software is almost install then popup  on execute Root Script

We login from root user and run script show on popup
after successful  run root.sh click on ok .


then click on close


This stage software installation done we start upgrade database 

Start Upgrade database
====================


We set some env. variable 
set ORACLE_HOME new oracle oracle home which we install 
set display
$export DISPLAY=yourip:0.0
check umask value should be 022
cd u01/app/oracle/product/11.2.0/db_1//bin

and run ./dbua
check =>umask 022
check =>xclock
Execute dbua from new oracle home


click on next

Here we select which database need to be upgrade then click on next


Check here warning then click on next


Here select appropriate value and degree of parallelism  as per env. here we take 1

if you upgrade time zone tick on timezone  dbua also recommend to take backup if need then ypu specify backup location then click on next


Here choose do not move database files as Part of upgrade

if you move file system to ASM so choose as per requirement
then click on next


check  report after upgrade report all components are show successful .

then you login the database from new ORACLE_HOME

check the /etc/oratab file

change .profile in unix/aix .bash_profile in linux set new oracle home location


Enjoy!!!